In-class Instruction Aids
A variety of audio-visual and other equipment is available for use during lectures. The Media Equipment division (now AV Installation and Classroom Services) of Instructional Development provides in Broida 1610 and 1640 a lectern computer connected to a data projector, with a DVD drive, a second data projector to project onto a side screen, a hard-wired microphone connected to the PA system, and a wireless microphone in 1610. Each room also has a document camera whose output you can connect to the data projector. The lecture demonstration area also has overhead projectors, several video cameras, two types of electronic blackboard system, and a document camera. Until the advent of iClicker Cloud, Instructional Development also provided some equipement for the iClicker in-class polling system. This page gives information about the iClicker system, the two electronic blackboards (an iPad system and a Monoprice tablet system), and a document camera that belongs to the physics department.
 |
 |
For perhaps the past few decades, professors have been experimenting with a variety of in-class exercises in order both to assess their effectiveness in presenting course material and to get some idea of how well their students are learning the material. The means used to collect students’ answers have ranged from flash cards to a variety of electronic devices, some hard-wired and some that operate via infrared transmission. To solve the various problems inherent in these systems, a team of physicists at the University of Illinois has developed a radio-frequency-based device they call “iClicker.”
Important note: In addition to the system described below, iClicker has developed a cloud-based system, which UCSB is adopting. In mid-summer, 2021, UCSB purchased a three-year license for the cloud service. The UCEN bookstore will not be ordering student remotes during this period.
The cloud-based version works with any mobile device (phone, tablet, etc.). If you wish to use the instructor’s remote (vide infra), you will need a base station so that the remote can communicate with the computer. Otherwise, iClicker Cloud does not require a base station. For information on this system, where to get software, and integrating iClicker Cloud with Canvas, see below.
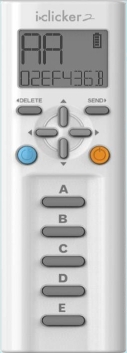
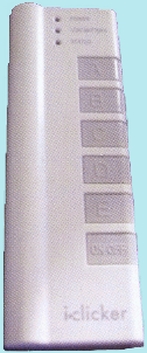
The iClicker system consists of the remote transmitters the students use to register their answers, and a receiver base. The photograph at left above shows one of the (relatively) new iClicker 2 transmitters, and the one at right shows one of the original iClicker transmitters. In addition to the on/off button and the five answer buttons, A through E, that are on the earlier iClicker remotes, the new units have a mode button (blue), four scrolling buttons (at center, just above the mode button and the power button (orange)), a delete button and a send button. Instead of the three LED status indicators on the earlier model, they have an LCD display that shows the mode, battery status, answer, and vote status. (There is now a new version, called the “iClicker +,” which has the look of the iClicker 2, but only a power button and five answer buttons. It also has a low battery indicator and an LED near each answer button to show which one the student sent, and whether it was received.) When the unit is first turned on, it displays the frequency setting and the transmitter ID. Student’s transmitters are white. Instructor’s transmitters are blue, and are identical to student’s transmitters except that they now have a laser pointer. Entering the ID of a particular transmitter into the preferences in the iClicker software allows the instructor to use that transmitter as a remote mouse. The available operations are: mode (i.e., multiple choice, numeric or alphanumeric), start/stop polling, show/hide polling data, advance slide, go back one slide, and toggle to show the correct answer (when data are displayed). The slide advance and return operations work with any presentation program running in slide show mode. All transmitters run on AAA cells, which are easily replaced. The receiver base plugs into a USB port, and it has an on-board USB port to accept a flash drive (though it’s best to use a second USB port on the computer, unless you also have the AC power adapter for the base station). Each base comes with a flash drive that contains the iClicker and iGrader software and all user documentation.
The receiver base is small, and it sits comfortably on top of the computer lectern. Besides the base and transmitters, there is no other hardware (except, of course, for the computer). The iClicker software works with a variety of popular presentation programs (PowerPoint, Excel, Word, Keynote, Acrobat, etc.). Since the software comes in the form of two executable files, there is nothing to install. At this writing, the lecture demonstration area has two new-style bases (one from Prof. Freedman and one from the instructional development department), two iClicker 2 teacher’s remotes (from the instructional development department), and two iClicker (old-style) remotes (from Prof. Freedman), for demonstration and practice purposes. We also have 16 old-style student’s remotes, in case you need to borrow any.
IMPORTANT NOTE: The iClicker system has available sixteen frequencies. Normally, for the base station, these may be set via the options section of the software. To avoid cross-talk between classes using iClickers simultaneously in two or more classrooms that are within transmitter range, Instructional Development has assigned frequencies to all the lecture halls on campus, and has placed fixed-frequency base stations there. Broida 1610 has been assigned the frequency AB, and Broida 1640 has been assigned AC. When using iClicker in either of these rooms, you must use the fixed-frequency base provided. The hardware frequency setting will override whatever you have set in the software. FURTHER IMPORTANT NOTE: Frequency setting for the iClicker transmitters is not automatic. The base station must be plugged into a USB port before you set the frequency of the transmitter. To set the frequency of the transmitter, hold down the power button until the frequency setting on the LCD display flashes. Then press buttons in the order of the appropriate two-letter frequency code. A check mark will appear, indicating that the frequency is set and the transmitter and the base are in communication. The iClicker 2 remotes remember the frequency setting, so this needs to be done only once for a given quarter, unless the remote is used in different places for which the base station frequencies are different. On an old-style remote, press the power button until the blue “POWER” LED begins to flash. Then enter the frequency as above. The “VOTE STATUS” LED will flash green, and the “POWER” LED will stop flashing. The old-style remotes do NOT remember the frequency setting when they are turned off, so it must be set every time they are used, if it is different from AA. If the base station is not plugged in, or the frequency code is incorrect, the new remote will show an error, and the frequency code will continue to flash. On an old-style remote, the “VOTE STATUS” LED will flash red, and the “POWER” LED will continue flashing.
IMPORTANT NOTE FOR MAC USERS: With the advent of OS X Mavericks, Apple introduced a feature called “App Nap.” This is a power-saving feature that puts applications that have been idle for a certain time into a kind of sleep mode. If either the iClicker program or your presentation program goes to sleep during your class session, the computer will not respond to your iClicker remote. To avoid this problem, DISABLE APP NAP. You may do this either for the whole system or for only those programs that you will use in class. To disable App Nap for a particular program, control-click the icon for the program, then choose “Get Info” in the menu that appears. Then, in the information window, check the box next to “Prevent App Nap.” This will keep the program from going to sleep. (If App Nap is active and a program goes to sleep, touching the touch pad should wake it up. Turning App Nap off, however, avoids the problem.)
You can see a copy of the literature for the original iClicker, which gives an overview of the system and a description of the hardware and software, here. You can find even more information at the i>clicker web site. You can also fill out a form here to request a copy of the iClicker classic software.
iClicker Cloud
NOTE: UCSB no longer uses GauchoSpace/Moodle for the learning management system. Canvas is now the learning management system. (Gauchocast is still available for uploading videos to Canvas.)
In order to use iClicker Cloud, you should download the iClicker Cloud software to your computer. (You can create an instructor account by going to the web site (iclicker.com), and you can probably also perform in-class polling via the web page, but the iClicker Cloud software on your computer makes all of this a bit easier.) All lectern computers on campus (that is, all computers installed by Instructional Development in campus classrooms and lecture halls) have iClicker Cloud installed on them.
The first step, if you have not used iClicker Cloud before, is to create an instructor's account. Next, you must create the course(s) for which you will be using iClicker. Once you have created a course in iClicker Cloud, you then link it to the Canvas course, then sync the roster and the grades. Step-by-step instructions for how to do these things are available at links below.
POSSIBLE PROBLEMS: If you have trouble downloading your class roster from Canvas, the two most likely causes are that the Canvas course page is still hidden from the students, or that the iClicker software needs an update. (The latter is still possible even if you have just downloaded the software from the link above.) If the course page is hidden, at least temporarily make it visible. If this does not fix the problem, then click on the “Help” tab in the iClicker starting window, then click “Check for Update” in the drop-down menu. If an update is available, a window will appear with a message telling you this. Click the “Update” button. Once the process is complete, you should be able to download the roster.
For information on iClicker Cloud from the LSIT Help Center, click here. The link “iClicker Cloud for Instructors” gives step-by-step instructions for installing iClicker Cloud and creating a course. The link in the middle and at the bottom of that page, iClicker Cloud in Canvas, contains links to instructions on how to link the iClicker Cloud course to the course in Canvas, sync the course roster and sync the grades.
You can also find similar information at the Macmillan web site here.
For information on iClicker Cloud from the iClicker web site, click here.
To download the iClicker software, click here.
You can arrange to view an on-line demonstration of iClicker, or a training session, by clicking “Register Now” under “See iClicker in Action,” in the left-hand column on this page, which also has links to other kinds of help.
You can reach technical support for iClicker by going to:
https://mhe.my.site.com/iclicker/s/.As noted above, you will not need an iClicker base station unless you would like to use a remote control to change the slides in your presentation, or to start and stop polling or to show and hide polling data. In order to do this, you must enter the ID of the remote in your iClicker profile, so that the computer can recognize the remote. To do this, log in to your iClicker account, and click on your name at the top right corner of the window. At the bottom of the menu that appears, click “Edit Profile.” In the box below “Instructor remote ID (Optional),” enter the remote ID, and then click “Save.” When you start an iClicker session, you will be able to control your presentation and the polling with the remote. Important: You must make sure that the window for the presentation software (PowerPoint, Acrobat, etc.) is the active window. If it is not, the software will not respond to the remote.
As is also noted above, the lecture demonstration area has two new-style bases, two iClicker 2 teacher’s remotes, and two iClicker (old-style) remotes, for demonstration and practice purposes, and for use in class in case you need them. We also have 16 old-style student’s remotes, in case you need to borrow any.
| The iPad System: |
The system in the photograph above is an iPad 2 (MC769LL/A), linked via Wi-Fi to a Dell Optiplex GX745 running Windows Vista. Installed on both is a program called Doceri. (“Docere” is the Latin verb “to teach.” “Doceri” is the passive form, i.e. “to be taught.”) Doceri is an interactive whiteboard and screencast recorder. That is, with a special stylus, you can write or draw on the iPad screen and have the resulting image sent to the data projector in the lecture hall, and the program records what you write, so that you can play it back at any time. When you fill up the whiteboard space, you can add a blank slide to continue. The saved presentation contains the separate slides. When you display the saved presentation, you can either play back your writing of each slide, or flip through the completed slides. Although the Doceri program does allow for recording audio, you cannot do this while the stylus is plugged into the iPad. If you are making a presentation before class, you can record the audio once you have finished making the video part of the presentation. If you would like to add audio to a saved presentation from class, you can do that as well.
The stylus that comes with the Doceri program connects to the iPad via the audio jack. (So if the pen acts strangely, check to see that the iPad volume control is turned all the way up; it is not hard to press the volume control button by accident.) One end of the stylus is the writing tip, and the other acts as an eraser. When you write with the stylus, you can rest your hand on the iPad screen, and, according to the settings for the pen, Doceri can tell which contact points are your hand and which is the pen, and it responds to the pen only. This allows you to write normally, as opposed to having to hold your hand above the screen and touch it with the pen tip only. You can select different pen styles and colors as you write. There are also tools for drawing straight lines, squares or rectangles, and circles or ellipses.
Doceri passes the image of the entire drawing area to the PC, which then puts that image on the video (VGA) port of the PC. A video splitter sends the video signal to the display at the rear of the cart, and to a cable that connects to the data projector in the lecture hall. While Doceri is running, you can still use certain touch commands on the iPad. With a two-finger swipe, you can enlarge or contract the drawing area, and you can drag it to change its position on the iPad screen. This allows you, for example, to divide the drawing area into different sections, enlarge a particular section to make it easier to write in, then move to a different, still enlarged section to write there. As you do this, the whole drawing area is diplayed in front of you on the monitor, so you can keep track of where you are in the drawing area.
Normally, to keep the battery charged, the iPad is plugged into the power strip as shown in the photograph above. If you wish, however, during class, you can unplug the 30-pin dock connector (at left in the photograph). The Wi-Fi connection allows you to carry the iPad around the lecture hall, so that you can have students write on it, for example, when you are having the students participate in solving a problem during class.
You can find information on the Doceri program at https://apps.apple.com/kr/app/doceri-interactive-whiteboard/id412443803?l=en.
| The Monoprice Tablet System: |

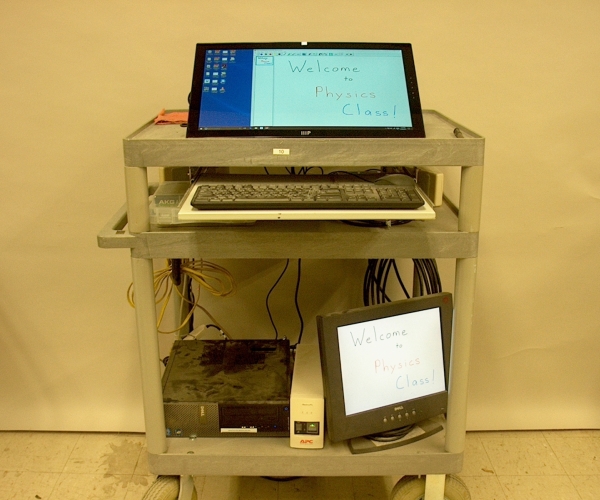
The system in the photograph above is a Dell Optiplex 390 running Windows 7, with a Monoprice model 14481 21.5″ drawing tablet for its primary display. The drawing tablet responds to an RF pen only, which ensures that you cannot accidentally draw anything with any part of your hand, or accidentally click on an icon or control that you had not intended to choose. A button on the side of the pen acts as a left mouse click (top part) or a right mouse click (bottom part).
For presentation software, this system has Classroom Presenter 3 (version 3.1), by the Center for Collaborative Technologies in the Computer Science and Engineering Department at University of Washington. This program allows you to create a “deck” of blank slides, on which you can write or draw. It sends the full area of the current slide to the video port for the secondary display (VGA). A video splitter allows for connection of both a second computer display, at right on the bottom shelf of the cart, and a cable to connect to the projector in the lecture hall. This allows you to see what the class is actually seeing on the projection screen.
Classroom Presenter can read PowerPoint (.ppt and .pptx) and .xps files, and, of course, those in its own format, .cp3. This means that you can either write your presentation during class, write it beforehand in Classroom Presenter, or make a PowerPoint presentation beforehand, to annotate during class in Classroom Presenter.
Once a deck is open in Classroom Presenter, you can save it as a .cp3 file, export it as a set of .png files, one for each slide, or export it as an .html file. If you export it as an .html file, Classroom Presenter automatically exports each slide as a .png file, and creates an .html file that contains a line that points to each .png file. When you open the .html file in a web browser, you see the slides in the order they were in the deck.
Classroom Presenter allows you to choose different pen colors, highlight and add text (in a standard font).
If you wish to record your lecture, this system also has installed on it Camtasia Studio 7 (version 7.1). This program allows you to select an area of the screen to record, and to record audio simultaneously. When you have finished recording, the program saves the raw data in a .camrec file. You can open this file in Camtasia Studio, and make various edits. Once you have finished editing the file, you can then have the program render it and save the result as an .mp4 file, which you can then upload, either to GauchoSpace or to YouTube, for your students to watch. To perform this recording, you need access to the audio line-level output from the booth in the lecture hall. Broida 1610 has such an audio line going to the computer lectern for those who use Panopto on the lectern computer to record their classes. Upon request, someone from Media Equipment can install a splitter inside the lectern so that you will be able to connect this audio line to the input of the Monoprice tablet system. (If this line is not available, lecture demonstrations has a second wireless microphone, whose output can be connected to the computer. You would wear this microphone along with the one that feeds the PA system in the lecture hall.)
If you would like to use the iClicker system, it is possible to do this with the Monoprice tablet system. At either side of the tablet is a USB port. You can use one for the iClicker base station, and the other for a flash drive, if necessary. The first time you use the iClicker software, you will probably have to drag the iClicker menu bar to where you would like it to appear on the auxiliary display, and also the box with the polling data, if you choose to display it. Once you have done this, these items should automatically appear where you set them the first time. As noted above in the section about the iClicker the base station is no longer necessary, unless you wish to use the iClicker instructor’s remote to change the slides in your presentation, or to start and stop polling or to display and hide polling data.
| The ELMO TT-12 Document Camera: |

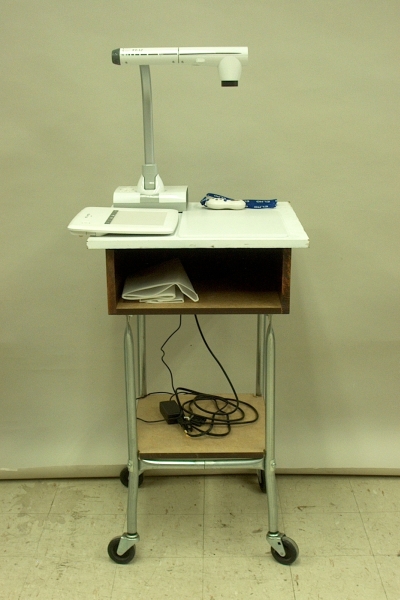
The photograph above shows an ELMO document camera, model TT-12, with remote control (infrared), stage and the CRA-1 wireless tablet. You can connect this camera to the data projector in either 1610 or 1640 via a VGA output. There is also an anti-glare sheet (not shown), in case it is necessary to reduce reflections from a particular document.
The document camera allows you to show notes, problem sets or other material to the class, and the CRA-1 tablet allows you to write or draw over the displayed material without physically writing on the document itself.
The TT-12 has a bright, white LED lamp to illuminate the document, if necessary (you can switch it on and off), and the camera is capable of a 12X zoom (with a further 8X digital zoom). The camera head is movable about four axes. You can rotate the camera head about its long axis backwards (into the photograph above) by 120 degrees, and forwards by 180 degrees. The whole head itself swings 180 degrees about an axis perpendicular to its long axis (from where it is shown above to where the camera is at left, on the same horizontal line). The camera support arm pivots forward (out of the photograph) up to 45 degrees, and, from where it is shown, can swing to the left about the vertical axis through 180 degrees, and to the right through 120 degrees.